stevenaeola
Documentation and tutorials
Making Music
My first sound
In node-red basics you used an inject node to send a message to another node (debug) running inside the node-red server. This just involved communication between the web browser and the node-red web server. Next you are going to send a message to another program running on the same computer, but in a different program: SuperCollider. SuperCollider is going to generate sounds for us.
First of all delete the debug node by selecting it and hitting the delete/backspace key. To select it just click on it, and you will see it outlined in orange. To select many nodes, either to delete them or move them around, drag a box around them with the mouse.
Next add a synth node, which is in the music section of the palette. By default this makes a bass drum (kick drum) sound, which will suit us fine. Next we need to get the synth instructions sent across to SuperCollider. To do this you are going to import some things from the library, where the relevant parts are already put together for you. At the top-right corner of the node red screen are the three lines of a “hamburger” menu.
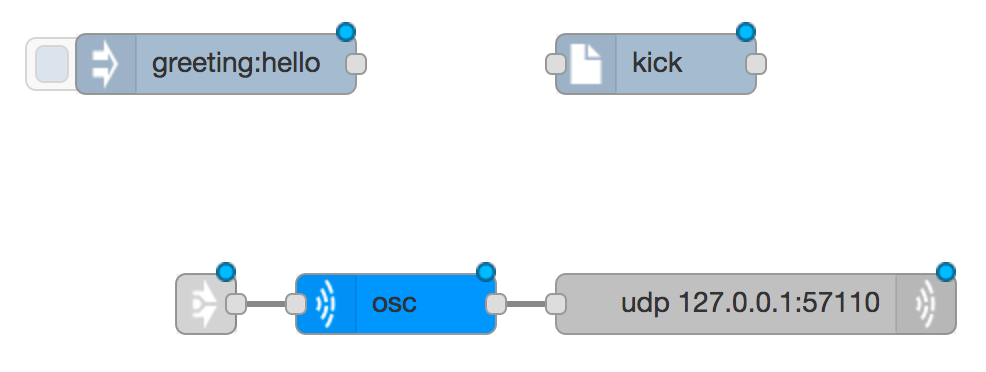
Click on here and select Import > Examples > music > component_supercollider. Three pre-joined nodes appear which you can place anywhere, including an OSC node and a UDP node.
OSC stands for Open Sound Control: it is a protocol designed for
packaging music information, and the SuperCollider server expects
messages in this format. It is connected to a udp node (short for
User Datagram Protocol) which sends information between different
applications and computers using the Internet Protocol (IP). You will
now have a set of nodes that look something like this:
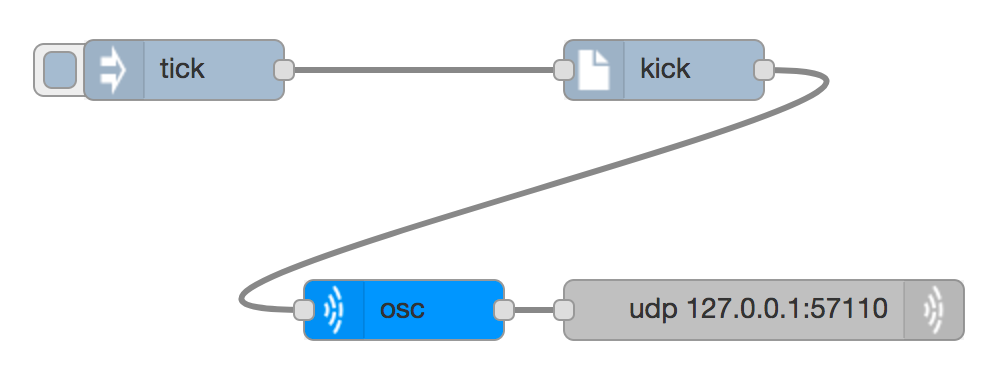
You may recognise the IP address used by the UDP node (127.0.0.1) as the address for the computer you are working on. When you accessed the node-red server you used port 1880, but the SuperCollider server is connected to port 57110. Both the osc and udp nodes are already configured as we need them (that’s why they were put in the library) but you need to work with the other nodes a little bit.
To the left of the osc node is another node with an arrow on that you don’t need for now, so just delete it.
You need the output of the kick synth node to go to the input of the osc node, so add a wire between them.
The inject node needs to be configured to send a message with a payload of “tick” and no topic, and its output needs to feed the input of the kick synth, so add a wire to do that. Now you should have a flow looking a bit like this:
Deploy this and click on the inject and you should hear a drum-like sound. If you don’t then make sure that
- You have something (probably headphones) plugged into the correct headphone socket.
- The sound isn’t muted (see the top-right corner of the screen)
- You have started the SuperCollider server correctly (see getting started)
Once it is working you can try changing the configuration of the synth to try different instrument sounds (although it is better to avoid the sustained synths for now), starting volumes and octaves. When you are editing a node, or have selected it, details about the inputs, outputs and configuration appear in the info tab in the sidebar on the right.
Making lots of sounds
The next music node to look at is the beat node, which behaves like a metronome, sending out regular ticks at a given speed. The speed of the ticks is measured in beats per minute (bpm), so that 60bpm is one per second. Beat nodes also accept messages to start, stop and reset them. The easiest way to get one set up is to import component_beatgenerator via the hamburger menu. This gives you a beat generator, with three inject nodes to start, stop and reset it, plus two divider nodes (called bar and section) and a link node. After importing the beat generator you will have something like this:
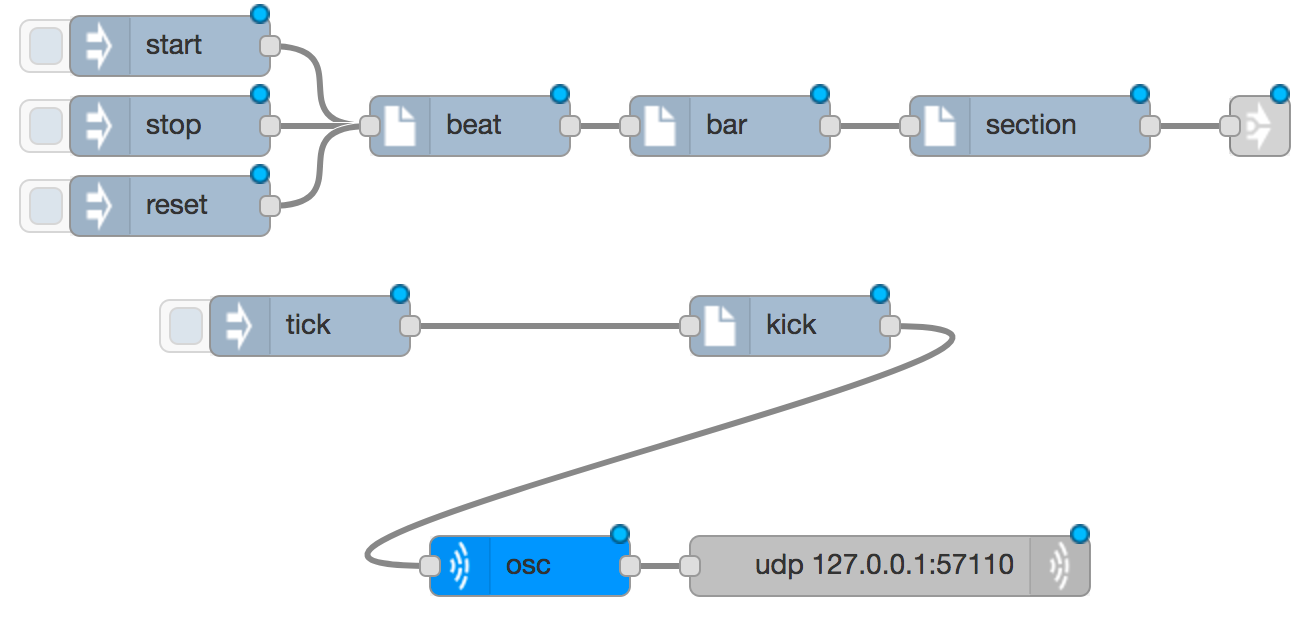
We will talk about the bar and section nodes later, but for now delete the link node on the right and the node for injecting tick that you defined before. Connect the output of section to the input of kick and you have something like this (the kick node has been moved here too):

In this flow when you click to inject a message with the payload start the beat generator will start sending tick messages through the two divider nodes, into the synth and then off to SuperCollider to make a sound like a toddler hitting a drum repeatedly. Once the interest of this dies away (this may take several seconds) then you can stop the beats and the sounds by injecting a stop or reset message.
The beat can be made faster or slower by configuring the beat node (try it). You can also change the speed of the beat while it is running by sending it a message with topic bpm and a payload of the new number of beats per minute. You can try this by adding one or more new inject nodes which feed into the beat node.
Drum beats
The beat node doesn’t just send messages with a payload of tick:
it includes other properties in the messages as well. You can look at
these by adding a new debug node which takes its input from
beat. If this is configured to display the complete msg object you
can see that it includes a property called beat and another one
called start. We’re going to look at those now, as well as the
divider nodes bar and section.
Beats in music are very often grouped together into bars. It is common for there to be four beats in a bar, but three and two and six are also used - five, seven and nine less often. You can have as many beats in a bar as you want, but the most I have ever seen is 15 and that’s very unusual. Usually the number of beats in a bar stays the same throughout the piece but it can change, particularly in more modern music.
What the bar node does is to divide the incoming beat ticks into
bars, and it does that by adding extra properties to the message as it
gets sent along. The beat property of the messages that get sent out
from the beat node are used to count the number of beats that have
been sent. If you use a debug node to look at the output of the bar
node you will see that it has two new properties: bar and
beat_of_bar. The bar property increases by one every four
beats. The beat_of_bar property increased by one every beat, but
resets to one again at the start of every bar. Also, if you look at
the start property it contains a list of things that start on that
tick. At the moment every tick is a beat, so the list always contains
“beat”. But once every four beats, when beat_of_bar is one, the
start property list also contains “bar”, to show that tick is also
the start of a bar.
Very interesting, but you were promised a drum beat, not just a lot of chat about object properties. Go to the “hamburger” menu and import “component_drumbeat”. I recommend putting it at the bottom, so you get something like this:
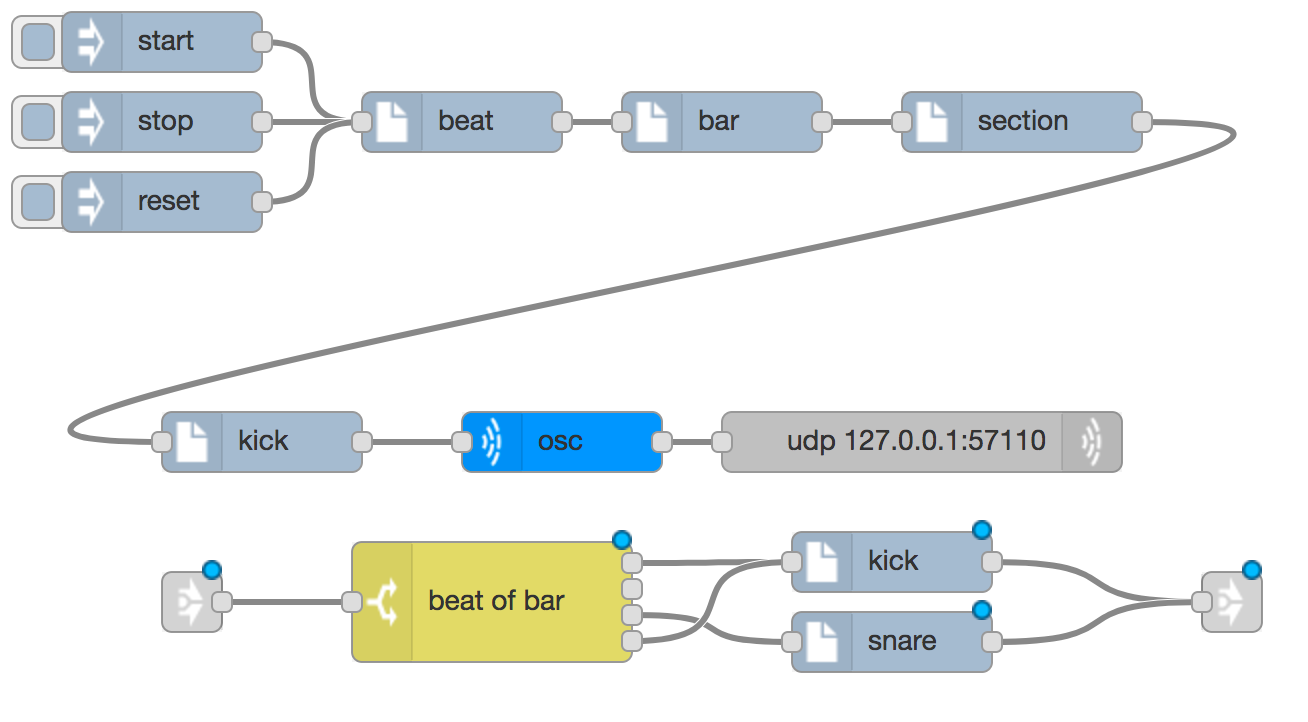
There are five new nodes here. Delete the link nodes at the left and
right hand end, as we have done before. Also delete the synth node
you had before, because instead you’re going to use the kick and
snare synth nodes you have just imported.
Instead of the output of section going straight into the synths,
you’re going to send it via the node marked beat_of_bar.
Also connect the two new synth nodes kick and snare to the input
of the osc node so that the sounds they make are sent to
SuperCollider.
To make things look prettier I’ve also moved the osc and udp nodes
underneath the new nodes we’ve added, so it looks like this:
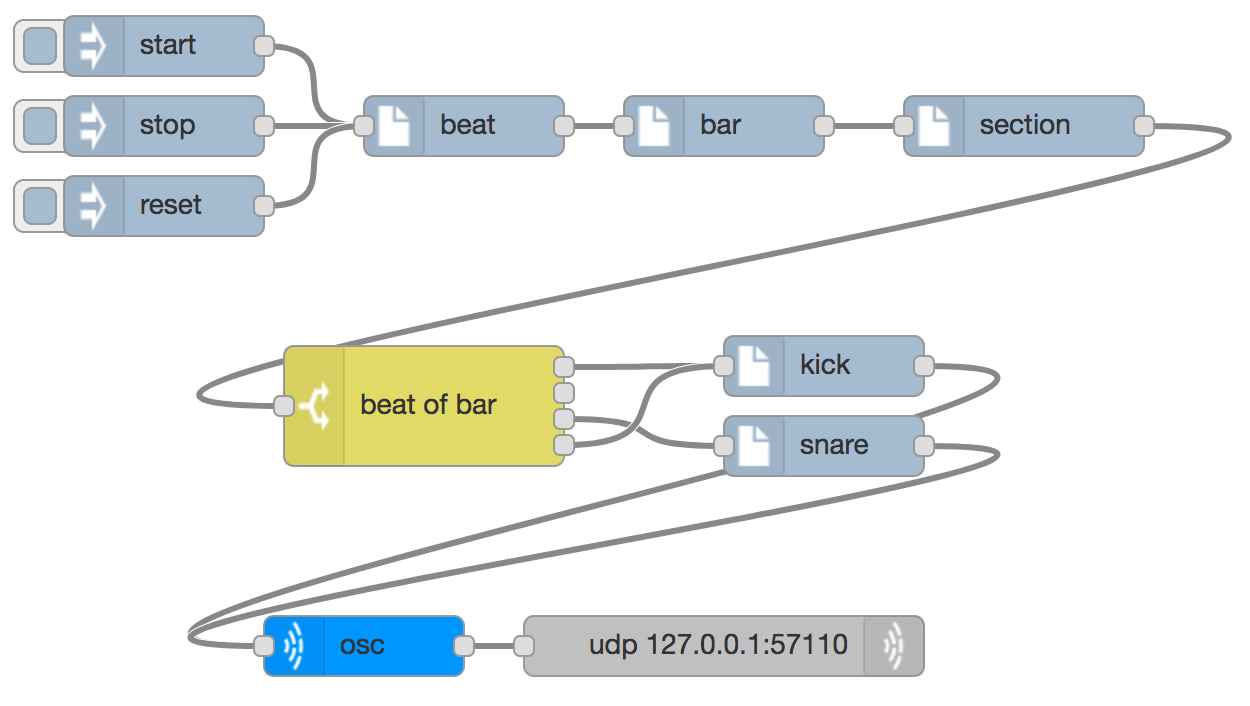
Deploy it, inject a start into the beat generator and you should
hear a drum beat. If you look at the configuration of the beat of
bar node you can see that it of type switch, which means that when
it gets an input it chooses which output to send it to. In this case
it uses the beat_of_bar property of the message to choose the
output. Because the kick node is connected to outputs one and four
(they are counted from the top), then the kick drum is played on the
first and fourth beats of the bar. The snare drum is played on the
third beat of the bar.
Try removing or adding wires between the beat of bar node and the
kick and snare synths to make drum beats. This works because very
often drum beats are repeated the same every bar. If a song had the
same tune or words repeated over and over again it would probably
sound boring, but repeating the drum beat usually sounds good.
Deployment options
On the right hand side of the “Deploy” button there is a pull-down menu that allows you to choose between
- Full
- Modified Flows
- Modified Nodes
You can only make this selection if there is something to deploy because something has changed. If you have to you can fool the system into thinking something has changed simply by moving a node to a slightly new position in the workspace.
“Full” deployment redeploys all of the nodes, even those that haven’t
changed. If you are using that option then the beat node will always
return to its initial state i.e. not ticking. At the moment we have
only one flow, so “Modified Flows” does the same as “Full”.
If you select “Modified Nodes” then you can change the pattern of the drum beat while the beat is still going.
Creating a drum beat
Now it’s over to you to create your own drum beat. You could try any, some or all of the following. They get more difficult as you go through the list, but more complicated isn’t always better when it comes to drum beats.
- Re-wire the beats into the
kickandsnaresynths on different beats of the bar - Change the
kickandsnaresynths to use different instruments - Add one or more different synths: make more than one sound on the same beat if you want
- If you find the beat sounds a little bit uneven that is because the
amount of time it takes for messages to pass through all the nodes
will vary. You can fix this by adding some “latency” in the
beatnode, which will tell the beat to happen at a point in the future rather than immediately. - Change the number of beats in the bar. Eight or sixteen beats allows
you to do a more interesting rhythm. Mission Impossible uses ten
beats, as does one of the regular tunes from Doctor Who. To do this
you will have to reconfigure the
barnode and add some more rules to thebeat of barswitch node. - Use the
bar_of_sectionproperty which is added by thesectiondivider nodes (there are eight bars in a section) so that the first or last bar of every section has a different rhythm (sometimes called a fill). You will need another copy of thebeat of barnode to create another rhythm, plus anotherswitchnode that uses thebar_of_sectionproperty to choose whichbeat of barnode to send the tick to. - Add a sub-beat to the beat generator at the bottom of the beat configuration. In music, half a beat is called a quaver, so there are two quavers per beat.
Some of these later ideas are included in a more complex example
called example_fancybeat which you can import to have a tinker
with. The next step is to do some sequencing.